
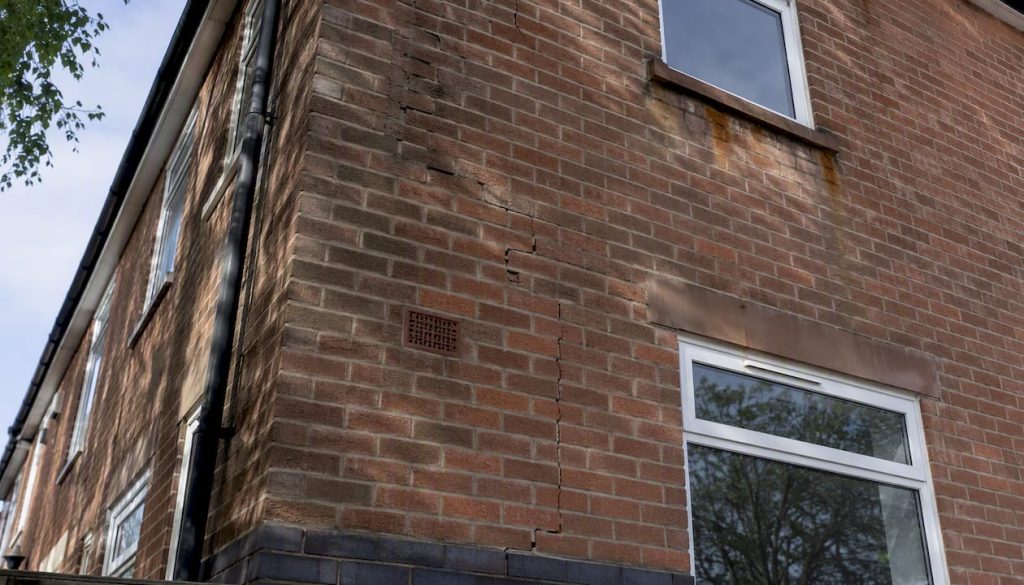
The most reliable external wall tie corrosion signs are horizontal cracking along mortar bed joints at regular intervals, rust staining on brick or mortar faces, mortar-bed separation, and outward bowing of the outer leaf. If you spot any of these, the right immediate step is to arrange an independent CWI Condition Inspection Survey before commissioning any remedial work. The Property Care Association confirms that these external indicators are among the most commonly observed symptoms of tie corrosion, particularly on exposed or south-westerly elevations.
Before you call anyone, do this:
- Photograph every affected elevation from a distance to show the full pattern, then close-up to capture individual cracks. Include a ruler or coin for scale.
- Measure crack widths and spacing. Note how far apart the cracked mortar courses are vertically — this helps a surveyor correlate them with likely tie positions.
- Record which elevations are affected (north, south, gable end) and whether the cracking is consistent or localised.
- Check for rust staining near air-brick ventilation holes, at damp-proof course level, and around window and door reveals.
- Keep a written log with dates, weather conditions and any changes you notice over time. Insurers and surveyors both value a documented timeline.
Pro Tip: When photographing mortar-course cracking, take one shot from arm’s length to show the horizontal run of the crack, and a second from 30cm away to show the joint width. Surveyors need both angles to assess severity before attending site.
Key takeaways
Wall tie corrosion signs are most reliably identified by horizontal cracking at regular mortar-course intervals, rust staining, mortar-bed separation, and outward bowing of the outer leaf, with an independent CWI Condition Inspection Survey the essential next step before any remedial work begins.
| Point | Details |
|---|---|
| Primary external signs | Horizontal mortar-course cracking at regular intervals, rust staining, bowing, and mortar-bed separation are the key indicators. |
| Silent failure risk | Modern wire and butterfly ties can corrode through with no visible cracking; borescope inspection is the only reliable way to confirm their condition. |
| Isolation is mandatory | Remedial ties installed at 2.5 ties per m² must be accompanied by isolation of original corroding ties to stop continued expansive damage. |
| Independent survey first | Always commission an independent OSCAR CWI Condition Inspection Survey before extraction or tie replacement to avoid unnecessary or incomplete work. |
| OSCAR Onsite | OSCAR Onsite provides evidence-led CWI Condition Inspection Surveys, accredited contractor referrals, technical monitoring and clearance certification across the UK. |
Table of Contents
- What are cavity wall ties and why do they matter?
- Why do wall ties corrode in UK masonry?
- What external signs should you look for on each elevation?
- Internal and structural signs that point to tie problems
- How professionals confirm whether corrosion is the cause
- What happens if you ignore wall tie corrosion?
- What should you do next if you spot the signs?
- Repair methods and how to reduce the risk of recurrence
- Why an independent OSCAR CWI Condition Inspection Survey matters
- OSCAR Onsite: independent surveys, monitoring and clearance certification
- Sources
What are cavity wall ties and why do they matter?
Cavity wall construction became standard in UK housing from the early twentieth century onwards. The outer leaf of brick and the inner leaf (brick or blockwork) are separated by a gap, typically 50–100mm wide, which provides thermal and weather resistance. Cavity wall ties are the metal connectors embedded in the mortar beds of both leaves to hold them together. Without them, the outer leaf has no lateral restraint and can separate, bow, or collapse under wind load.
Ties are typically installed in a staggered grid pattern: at regular vertical and horizontal intervals to provide adequate structural support, with closer spacing near openings and at corners. That regular vertical spacing is precisely why corrosion produces such a recognisable symptom. When a steel tie rusts, it expands. According to the Wall Tie Manual, rust lamination can expand steel up to four times its original volume, splitting the mortar bed joint at the exact course where the tie sits. Repeat that across a wall and you get a ladder of horizontal cracks at predictable intervals.
A simple cross-section of a cavity wall shows: inner leaf, air gap (sometimes filled with insulation), outer leaf, and the tie spanning the cavity with each end bedded into mortar. That embedded end is where corrosion begins, hidden from view.
Why do wall ties corrode in UK masonry?
Several factors drive corrosion, and they often combine:
- Moisture ingress. The outer leaf is permanently exposed to rain. Water migrates through mortar joints and reaches the tie, particularly where pointing has deteriorated or cavity insulation bridges the gap.
- Thin or failed galvanising. Older mild-steel ties relied on a zinc coating for protection. Where that coating was thin, poorly applied, or damaged during installation, corrosion begins within decades.
- Coastal and exposed elevations. Salt-laden air accelerates zinc loss significantly. The Wall Tie Manual notes that corrosion rates are faster in the damp outer leaf, and exposure compounds this.
- Sulphate-bearing or ash mortars. Some pre-1980s properties used mortars containing industrial ash or high-sulphate content, which are chemically aggressive to steel.
- Cavity insulation trapping moisture. Poorly installed or saturated cavity fill can hold water against the tie, accelerating deterioration.
- Poor installation. Insufficient tie density, incorrect embedment depth, or ties laid with a downward slope towards the inner leaf can all worsen moisture exposure.
Pro Tip: Tie type matters enormously for how symptoms present. Older fishtail and twisted-flat ties are thicker steel; when they corrode, they expand and crack mortar visibly. Modern butterfly and wire ties are thin enough to corrode completely without producing the same volumetric expansion — meaning the wall can look fine while the ties have effectively gone. According to LABC Warranty technical guidance, this silent failure mode is one reason borescope inspection is essential rather than optional.
What external signs should you look for on each elevation?
This is where a careful walk around the property pays off. Work systematically, elevation by elevation, and look for the following:
Horizontal cracking at mortar bed joints. The most telling sign. Cracks running horizontally along mortar courses at roughly regular vertical intervals — often every five to seven courses — suggest tie expansion is splitting the joint at each tie position. LABC Warranty describes this as a direct consequence of rust lamination forcing the mortar apart. The cracks may be fine at first, widening gradually over years.
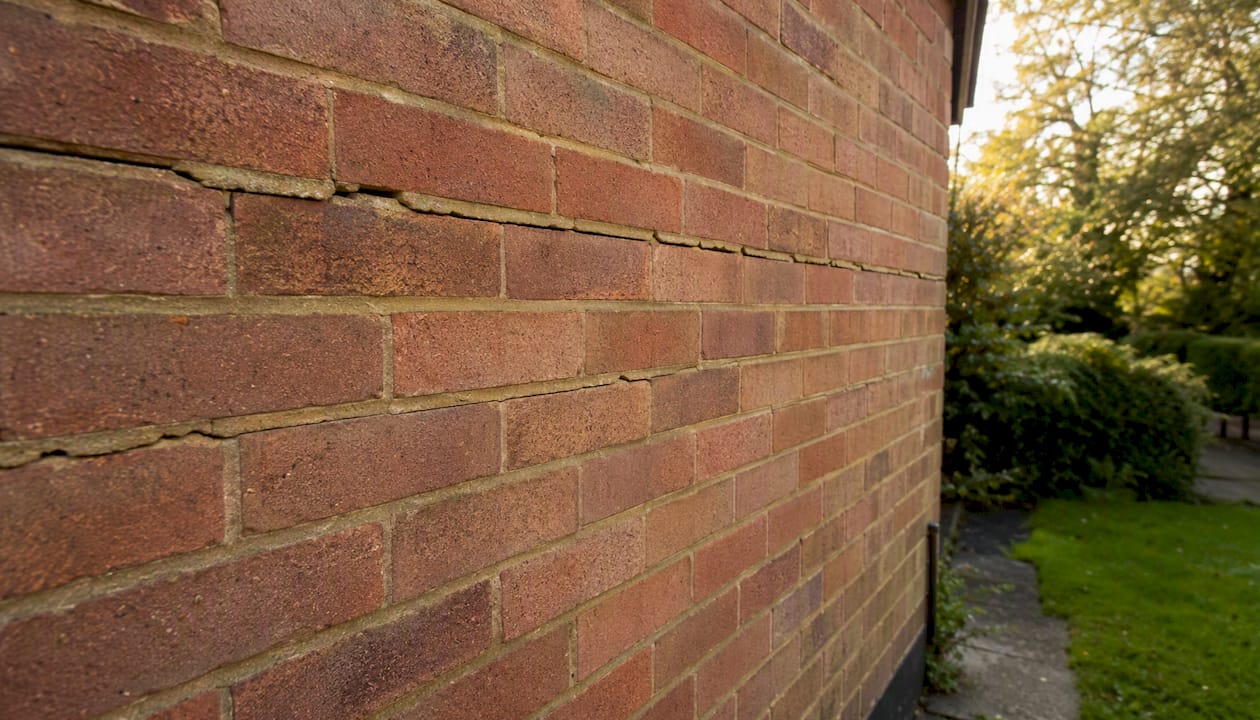
Mortar-bed separation and widened joints. Look for joints where the mortar has pulled away from the brick face above or below, or where the joint appears wider than surrounding courses. This differs from general settlement cracking, which tends to be diagonal and follows the line of least resistance through brick and mortar rather than running cleanly along a single course.
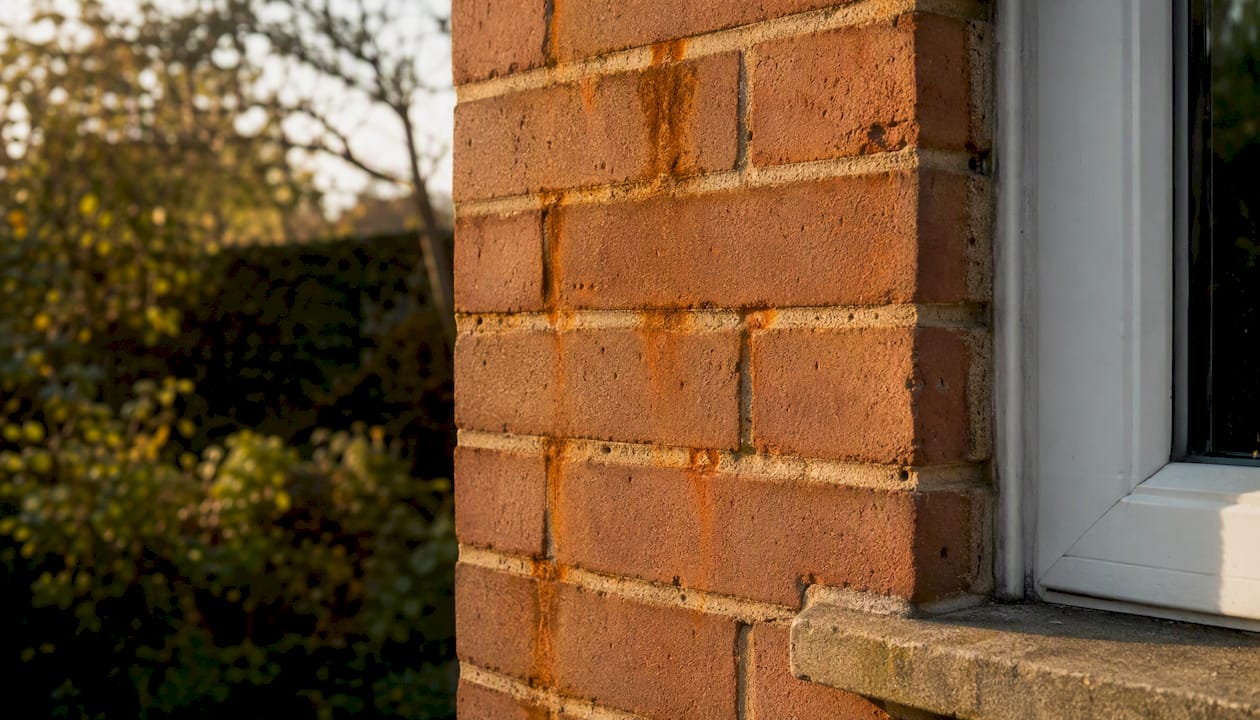
Rust staining. Brown or orange streaking on brick faces or mortar joints, especially near air-brick ventilation holes, at damp-proof course level, or around the edges of window and door openings. The staining can be subtle — a faint orange tinge in the mortar rather than a dramatic streak.
Bulging or bowing of the outer leaf. Hold a long straight edge or spirit level against the wall face. Even a few millimetres of outward movement is significant. Gable ends and exposed elevations are most vulnerable because they carry the highest wind load and often have the least restraint at the top. The Property Care Association identifies outward bulging as one of the primary indicators of advanced tie failure.
Loose or displaced bricks, lifted sills and lintels. In more advanced cases, individual bricks may feel loose, or you may notice a slight upward lift at a gable verge — sometimes called a pagoda effect — where the outer leaf has begun to separate and move independently.
Pro Tip: Tie-related bed-joint cracking runs cleanly and horizontally along a single mortar course. Sulphate attack, by contrast, tends to affect many joints across the wall face with white crystalline deposits and a more generalised pattern of expansion. If you see white efflorescence across multiple joints rather than localised horizontal cracking, sulphate attack may be the primary cause — though both can coexist. Designing Buildings notes this distinction as one surveyors routinely apply during assessment.
Internal and structural signs that point to tie problems
External signs are the starting point, but internal clues can corroborate what you are seeing outside.
- Horizontal cracks on internal plaster that mirror the pattern of external mortar-course cracking. These appear where the outer leaf movement transmits stress through the wall structure to internal finishes.
- Cracks at the junction of internal walls and ceilings, particularly on external walls, suggesting the outer leaf is moving relative to the inner structure.
- Doors and windows that stick or develop widening gaps in their reveals. If the outer leaf is bowing outward, it can distort the reveals around openings, making frames rack slightly out of square.
- Separation of skirting boards or architraves from the wall surface on external walls, or movement lines where plaster or render has cracked along a horizontal line.
- Lifted or misaligned lintels and cills, where the outer leaf movement has displaced the masonry above or below an opening.
One important caveat: modern wire and butterfly ties can corrode through without producing the volumetric expansion that drives visible cracking. Sava’s practitioner guidance makes this point clearly — the wall may look entirely normal from outside while the ties have lost structural integrity. Internal signs alone are rarely definitive, but combined with external indicators, they build a picture that justifies professional investigation.
How professionals confirm whether corrosion is the cause
A competent surveyor does not rely on visual inspection alone. The diagnostic process typically follows a sequence from least to most invasive.
Non-intrusive methods first:
- External visual survey of all elevations, noting crack patterns, staining, bowing and mortar condition.
- Electronic tie detection using a calibrated metal detector to locate tie positions through the outer leaf. This confirms where ties should be and whether the spacing matches the original specification.
- Thermal imaging to identify cavity anomalies, moisture distribution and areas of bridging or insulation failure. A thermal imaging camera used under appropriate temperature differential conditions can reveal cold bridges and damp zones that correlate with tie positions.
Minimally invasive checks:
- Borescope or endoscope inspection through small drilled ports in the mortar joints. This is the standard non-destructive method for directly viewing tie condition and cavity contents, as described in Target Fixings’ guidance on wall tie failure. A camera passed through a 10–12mm hole gives a clear image of the tie, its zinc coating, any rust lamination, and the state of the cavity.
- Selective opening where borescope images are inconclusive. A small section of outer leaf is temporarily removed to allow direct inspection and sample extraction. This is sometimes necessary where ties are obscured by insulation or where the borescope image cannot resolve the degree of corrosion.
Equipment used in a professional survey: electronic tie detector, endoscope or borescope with a recording facility, thermal imaging camera, moisture meter, and a calibrated crack gauge. Each tool answers a different question: the detector locates, the borescope shows condition, the thermal camera reveals moisture, and the crack gauge tracks progression.
Pro Tip: Drill-hole patterns in mortar joints are not proof that tie replacement has already been done. Resin-fixed remedial ties are sometimes installed through mortar rather than brick, and the holes look similar. An independent OSCAR CWI Condition Inspection Survey uses borescope evidence and sample inspection to differentiate between original corroding ties and previously installed remedial ties — a distinction that matters enormously when scoping further work.
What happens if you ignore wall tie corrosion?
Corrosion does not stabilise on its own. The progression is predictable and the costs compound.
- Progressive mortar splitting and joint widening as rust lamination continues to expand. What starts as a hairline crack becomes a gap wide enough to admit water freely.
- Increasing outward movement of the outer leaf, from a few millimetres of bow to partial separation. At this stage, the wall is carrying wind load without adequate lateral restraint.
- Escalating repair costs. Early-stage intervention typically involves tie replacement and re-pointing. Delayed action can mean partial rebuilding of the outer leaf, scaffold for extended periods, and significantly higher labour costs.
- Water ingress and damp. Open mortar joints allow rain penetration directly into the cavity and potentially through to internal finishes. The cavity wall insulation health risks associated with persistent damp include mould growth and deteriorating air quality.
- Insurance and valuation complications. Structural movement noted on a survey report can affect mortgage valuations, trigger insurance exclusions, and complicate sale or remortgage.
Cost drivers for remedial work include: access requirements (scaffold versus ladder), the number of elevations affected, whether old ties must be isolated as well as replaced, whether cavity insulation needs extraction first, and the extent of re-pointing required after tie installation.
What should you do next if you spot the signs?
Act in a logical order. Rushing to a contractor without an independent survey first is how homeowners end up with unnecessary extraction or incomplete repairs.
- Record and photograph. Capture every affected elevation with distance shots and close-ups. Note the date and weather.
- Measure crack widths and vertical spacing. Use a crack gauge or a ruler. Record the distance between cracked courses — this helps correlate cracks with tie positions.
- Note which elevations are affected. South-westerly and exposed elevations tend to show symptoms first.
- Compare with neighbouring properties. If adjacent houses of the same age and construction show similar cracking, that is useful corroborating evidence.
- Arrange an independent OSCAR CWI Condition Inspection Survey. This is the critical step before any remedial work is commissioned. The survey uses borescope evidence, electronic tie detection and a written report with recommendations — not a sales pitch for extraction.
- Receive a written report. The report should specify which ties are corroded, the extent of damage, and a recommended scope of works.
- Select an accredited contractor. Ask for NVQ-qualified operatives or OSCAR Onsite-accredited membership. Request a detailed scope of works.
When reviewing quotes, check for:
- Number of replacement ties per m² (the typical target is 2.5 ties per m²)
- Fixing method: resin-bonded or mechanical
- Whether original ties will be isolated as well as replaced
- Timescale and access method
- Whether independent technical monitoring and clearance certification are included
For realistic timescale expectations, the cavity wall extraction timescale guide covers what to expect when extraction is also required alongside tie work.
Repair methods and how to reduce the risk of recurrence
Remedial tie replacement is the standard approach. Stainless-steel remedial ties are installed through the outer leaf at the appropriate density — typically 2.5 ties per m² as an industry standard guideline, with higher density near openings and at corners. Resin-bonded ties are fixed through a drilled hole with a structural adhesive; mechanical expansion ties use a different fixing principle. Both are effective when correctly specified and installed.
Isolation of original ties is not optional. Simply adding new ties without treating the old corroding ones leaves the expansion mechanism active. The Property Care Association and LABC Warranty guidance both emphasise that old ties must be isolated to prevent continued expansive damage to the outer leaf. Isolation typically involves cutting the tie flush with the inner leaf and applying a corrosion-inhibiting treatment.
Partial versus full replacement depends on the survey findings. Where corrosion is localised to one elevation or a specific height band, selective replacement may be sufficient. Where the survey reveals widespread failure across multiple elevations, a full programme is more appropriate.
Preventive measures worth considering after remediation:
- Improve external drainage and detailing to reduce water loading on the outer leaf.
- Avoid cavity bridging when re-pointing or installing new insulation.
- Consider the partial fill versus full fill cavity options carefully if insulation is being reinstalled, as fill type affects moisture management.
- Manage external moisture sources: clear gutters, repair flashings, and check that air bricks are unobstructed.
On the resin versus mechanical debate: resin-bonded ties are minimally invasive, cause less disruption to the outer leaf, and are widely used in domestic remediation. Mechanical ties can be faster to install but require precise drilling. Longevity is comparable when either type is correctly specified for the substrate. The real differentiator is the quality of the survey that precedes the installation, not the fixing type itself.
Why an independent OSCAR CWI Condition Inspection Survey matters
The risk with wall tie corrosion is not just the corrosion itself — it is the decisions made in response to it. A contractor who profits from extraction or tie replacement has a structural incentive to recommend more work than is necessary. An independent survey removes that conflict.
The OSCAR CWI Condition Inspection Survey is an evidence-led assessment using borescope inspection, electronic tie detection, thermal imaging and a written report with findings and recommendations. It tells you what is actually happening in the cavity, not what a remedial contractor needs to sell.
OSCAR Onsite’s credentials in this space are specific:
- Authored the UK’s first NVQ Level 2 Diploma in Cavity Wall Insulation Surveying and Inspection and the NVQ Level 2 Diploma in CWI Extraction and Clearance, which are the national benchmark qualifications for the sector.
- Delivers a CWI Surveyor Awareness Course for RICS surveyors, building surveyors, DEAs, retrofit professionals, housing providers, mortgage lenders and conveyancing solicitors.
- Operates a Member Accreditation Scheme covering more than 250 independent firms across the UK, verified through audits and continuous professional development.
- Provides independent Technical Monitoring and Clearance Certification to confirm that remedial works meet PAS 2030:2023, BS 8104 and TrustMark requirements.
The UK Building Regulations Approved Document A provides the structural framework within which all remedial tie work must comply, and independent technical monitoring is the mechanism that confirms compliance has been achieved on your specific property.
Where remedial works are instructed, OSCAR Onsite recommends using an OSCAR Onsite-accredited member firm, followed by independent technical monitoring and a clearance certificate to confirm the works meet the required standard.
A note from an experienced CWI inspector
The diagnostic error I see most often is confusing sulphate attack with wall tie corrosion. Both produce horizontal cracking, and both are more common in pre-1980s properties. The difference is in the detail: sulphate attack tends to produce white crystalline deposits across a broad area of the wall face, with a generalised expansion of many joints. Tie corrosion localises. The cracking follows the tie grid — specific courses, at predictable intervals, often with rust staining nearby. When I attend a property where the homeowner has already been told they need full tie replacement, I sometimes find sulphate attack is the primary cause, or that only one elevation has genuine tie failure while the others are sound.
The practical lesson: photograph everything before anyone drills a hole. A good photographic record of crack patterns, staining and spacing, taken before any investigation begins, is the most useful piece of evidence a surveyor can have. It shows the pattern before disturbance, and it protects you if there is ever a dispute about what was found and when.
OSCAR Onsite: independent surveys, monitoring and clearance certification
If you have spotted any of the signs described in this article, the next step is an independent assessment, not a remedial quote.

OSCAR Onsite provides CWI Condition Inspection Surveys that use borescope evidence, electronic tie detection and thermal imaging to give you a clear, written picture of what is happening in your cavity. No sales agenda. No extraction recommended unless the evidence justifies it. Where remedial works are needed, OSCAR Onsite can refer you to an accredited member firm and provide independent technical monitoring throughout the works, followed by a clearance certificate confirming completion to standard. Book your independent OSCAR CWI Condition Inspection Survey at Oscaronsite.
Sources
- Property Care Association — cavity wall ties
- LABC Warranty technical update — wall tie replacement in existing buildings
- BRE Digest / BR technical document (BR guidance PDF)
- Sava — cavity wall tie failure
- Wall Tie Manual (Kingfisher UK)