
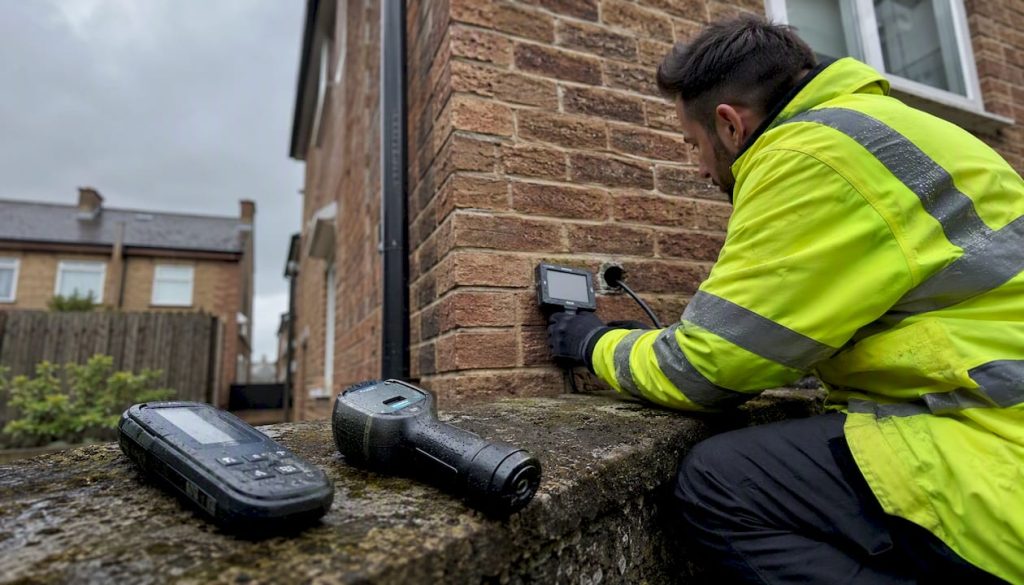
Most condensation problems in homes with cavity wall insulation stem from ventilation failures, building defects, or poorly specified materials — not the insulation spontaneously generating moisture. That distinction matters enormously for what you do next. BS 5250, the UK’s code of practice for controlling dampness in buildings, is clear that surface condensation forms wherever a surface drops below the dew point — and that cause is usually inadequate heating or ventilation, not the cavity fill itself. A RICS Level 3 Building Survey or an independent OSCAR CWI Condition Inspection Survey is the right first step before anyone touches your walls.
Immediate actions if you are seeing damp or mould now:
- Open windows and run extract fans to ventilate affected rooms — do not seal draughts before you have a diagnosis.
- Photograph damp patches after heavy rain and note their exact location (height, which wall, near a window reveal or mid-wall).
- Do not let any contractor pressure you into extraction without first providing written diagnostic evidence.
- Document whether symptoms worsen in cold weather or after prolonged rain — that pattern is diagnostic information.
Pro Tip: If you spot mould on a wall, ventilate the room immediately. Do not apply bleach directly to mould on plaster — it kills surface growth but drives spores deeper and does nothing to address the underlying moisture source.
Key takeaways
Condensation in cavity walls is almost always diagnosable with the right tools — and the right first step is always an independent inspection, not extraction.
| Point | Details |
|---|---|
| Diagnose before you act | Surface and interstitial condensation have different causes; only a formal inspection with thermal imaging, borescope, and moisture metering can confirm which you have. |
| Insulation is rarely the sole cause | Ventilation failures, blocked weep holes, failed pointing, and wrong product specification are the most common contributors to cavity wall moisture issues. |
| Drying takes longer than expected | Salford University research found inner masonry drying can take months; do not accept a clearance certificate issued immediately after extraction. |
| Demand evidence, not a sales pitch | Any contractor recommending extraction without a written condition report, borescope stills, and moisture logs is a red flag — walk away. |
| OSCAR Onsite inspection first | Book an independent CWI Condition Inspection Survey at oscaronsite.co.uk before agreeing to any remedial works. |
Table of Contents
- What is condensation in cavity walls, and which type do you have?
- How cavity wall insulation can contribute to moisture problems
- What signs should you watch for as a homeowner?
- How do professionals diagnose the cause properly?
- What are the remedial options, and when does each apply?
- How long does drying out take after remedial works?
- When should you get professional help, and what should you ask?
- How can you reduce the risk of condensation recurring?
- Why independent, evidence-led inspection is the only sensible starting point
- An independent inspection from OSCAR Onsite: what to expect
- Sources
What is condensation in cavity walls, and which type do you have?
Two distinct phenomena share the label “wall condensation,” and confusing them leads to the wrong remedy.
Surface condensation forms on the inner face of an external wall when that surface temperature falls below the dew point of the room air. It is the same physics as a cold glass of water sweating on a warm day. You will typically see it at window reveals, in corners, and behind furniture where air circulation is poor. The Property Care Association’s code of practice notes that surface condensation can be distinguished from rising damp by sampling the wall at depth — surface condensation is wet at the face but dry further in.
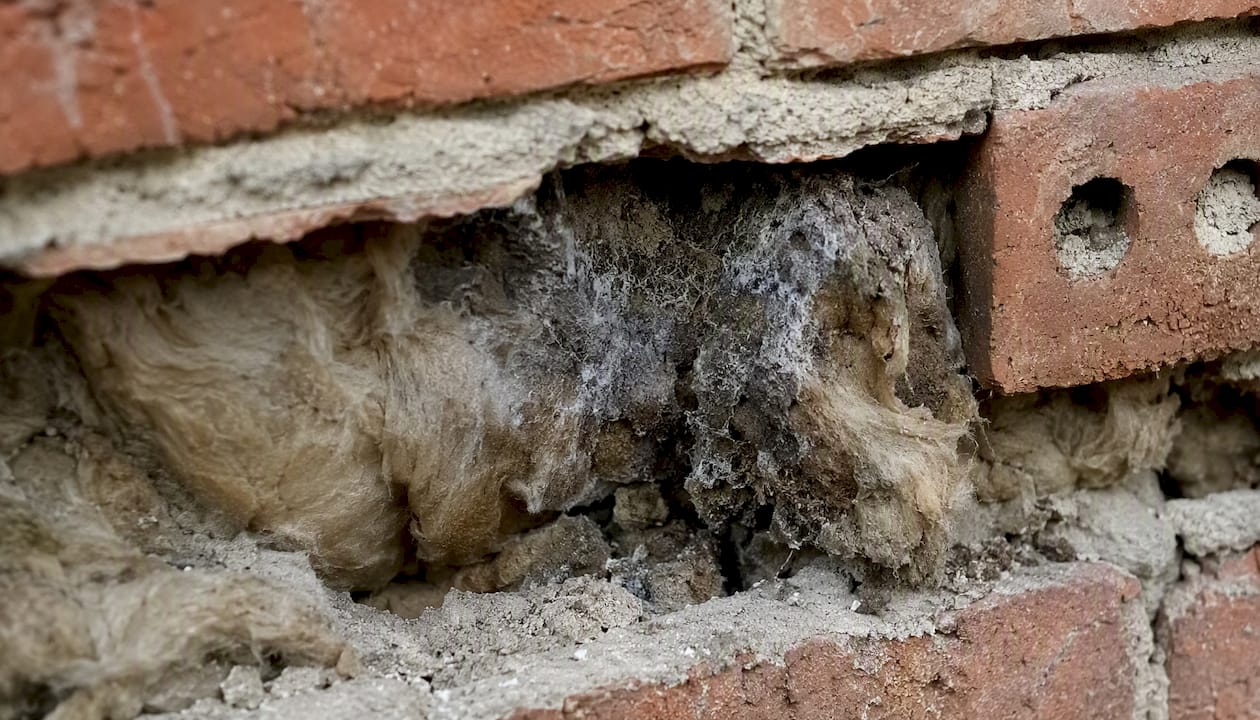
Interstitial condensation forms inside the wall construction, at the point where warm, moisture-laden air from the interior meets a cold surface within the build-up — often the insulation-to-outer-leaf interface. You cannot see it directly. It shows up as persistent damp patches that do not dry out between wet spells, or as mould that returns quickly after cleaning. Research from Salford University (AIVC) found that in insulated cavity walls, condensation is often restricted to the insulation/brick interface — which means a moisture meter reading at the inner face alone can give a misleading picture.
Why the distinction matters:
- Surface condensation is usually addressed by improving ventilation, heating, or internal surface temperatures (for example, by improving window insulation to raise reveal temperatures).
- Interstitial condensation may indicate a poorly detailed insulation system and requires a more thorough investigation before any remedial decision.
- BS 5250 governs both — any contractor or surveyor working on your property should be familiar with it.
How cavity wall insulation can contribute to moisture problems
Cavity wall insulation does not create moisture from nothing. What it can do is change the thermal and drainage behaviour of a wall in ways that make existing moisture problems worse, or create new pathways for water to travel.
The main failure mechanisms, as identified in practitioner surveys of 1980s–1990s housing stock, are:
- Slumping or settlement: Blown mineral fibre can compact over time, leaving voids at the top of the cavity where cold bridging then occurs.
- Cavity bridging: Mortar droppings, debris, or poorly installed insulation create a physical path for water to cross from the outer leaf to the inner leaf.
- Saturation from rain penetration: In exposed locations, the outer leaf can absorb enough water to saturate the insulation, which then holds moisture against the inner leaf rather than allowing it to drain.
- Blocked weep holes: Weep holes at the base of the cavity allow water to escape. Blocked or absent weep holes mean standing water accumulates.
- Wrong product for the exposure zone: Mineral fibre is unsuitable for highly exposed sites; EPS bead with adhesive is generally recommended for more exposed locations because it does not absorb water in the same way.
- Poor termination at reveals: Insulation that is not properly terminated at window and door reveals creates cold bridges exactly where surface condensation is most likely to form.
- Foam fills: Polyurethane foam cannot be vacuum-extracted without significant demolition. It also has no drainage capacity, so any water that enters the cavity has nowhere to go.
| Failure mechanism | Likely location on wall | Sign the homeowner sees |
|---|---|---|
| Slumping/settlement | Upper sections of wall | Cold band near eaves; mould at ceiling level |
| Cavity bridging | Mid-wall, around mortar droppings | Damp patch unrelated to rain timing |
| Saturation from rain | Exposed elevations, full height | Damp worsening after prolonged rain |
| Blocked weep holes | Base of wall | Damp at skirting level on external walls |
| Wrong product/exposure | Windward elevations | Widespread damp across exposed face |
| Poor reveal termination | Window and door surrounds | Mould at reveals; cold spots on thermal image |
The government’s IWI guidance reinforces this: interstitial condensation risk increases where insulation is poorly detailed, and the recommended mitigation is either a ventilated cold-side cavity or a moisture-open build-up — not simply removing the insulation. Product choice and installation quality are the variables that matter most.
What signs should you watch for as a homeowner?
Symptoms alone cannot tell you whether you are dealing with condensation, penetrating damp, or rising damp — but they can tell you where to look and what evidence to gather before calling anyone.
Signs that suggest surface condensation:
- Mould appearing first at window reveals, corners, or behind furniture.
- Damp patches that are worse in cold weather and improve when the heating is on.
- Condensation on windows in the same rooms where wall mould appears.
- No correlation with heavy rainfall.
Signs that suggest penetrating damp or a cavity failure:
- Damp patches at mid-wall height on an exposed elevation, appearing or worsening after prolonged rain.
- Cold spots on walls that are localised rather than spread across the whole surface.
- Efflorescence (white salt deposits) on the inner face of an external wall — salts are carried by water moving through masonry.
- Peeling paint or blistering plaster that recurs after redecoration.
- A persistent damp smell in a room even when ventilation is adequate.
How to log symptoms effectively:
- Photograph every damp patch immediately after heavy rain and again two weeks later to see whether it dries.
- Note the height from floor level and the distance from the nearest window or corner.
- Record the weather conditions (wind direction, rainfall intensity) when symptoms are worst.
- If you have a basic moisture meter, take readings at the face of the plaster and note them with dates.
A clear evidence trail like this is exactly what a professional inspector needs to form a reliable diagnosis. It also protects you if a contractor later claims the problem is more extensive than it actually is.
How do professionals diagnose the cause properly?
A proper condition inspection follows a stepwise sequence, moving from non-intrusive to intrusive methods only when the earlier steps do not give a clear answer. Relying on a single tool is a known risk: thermal imaging, moisture meters, and borescope inspection are complementary and should all be reported together in a formal condition report.
- Visual inspection: External and internal. Check pointing, render, gutters, downpipes, weep holes, cavity trays, and window seals. Many problems are visible before any equipment is used.
- Calibrated moisture metering: Readings taken at multiple depths and locations, logged with dates. Surface readings alone are not enough — depth readings help distinguish surface condensation from moisture moving through the wall.
- Thermal imaging (infrared thermography): Identifies cold bridges, insulation voids, and areas of elevated moisture. Most reliable in winter or when there is a temperature differential of at least 10°C between inside and outside. Thermal imaging can miss voids in summer or after solar gain, so readings must always be cross-referenced with moisture data.
- Borescope inspection: A small camera inserted through a drilled hole in the mortar joint allows direct visual inspection of the cavity. It can confirm insulation presence, slumping, bridging, debris, and standing water — things no surface tool can detect.
- Intrusive inspection: Where the above steps are inconclusive, targeted opening of the wall construction may be needed to inspect at depth.
| Diagnostic method | What it detects | Key limitations |
|---|---|---|
| Calibrated moisture metering | Moisture content at surface and depth | Cannot identify cause; affected by salts and plaster type |
| Thermal imaging | Cold bridges, voids, moisture patterns | Weather dependent; unreliable in summer or after solar gain |
| Borescope inspection | Cavity condition, insulation state, bridging, debris | Limited field of view; requires drilled access holes |
| Intrusive inspection | Direct evidence of failure mechanism | Disruptive; requires reinstatement |
When to commission a RICS Level 3 Building Survey:
Escalate to a RICS Level 3 survey when multiple elevations are affected, when there is evidence of cavity bridging or wall tie corrosion, when a retrofit installation is involved, or when the property is being purchased and the buyer needs an independent assessment of structural and moisture risk.
Pro Tip: Before agreeing to any works, ask the inspector to provide thermal images, borescope stills or video, moisture logs, and a formal written CWI Condition Inspection Survey report. If they cannot or will not supply all four, do not proceed.
What are the remedial options, and when does each apply?
The right remedy follows directly from the confirmed cause. Extraction is not the default answer, and it is certainly not the first one.
Remedial options, from least to most disruptive:
- Ventilation and heating adjustments: For surface condensation caused by inadequate air exchange or low internal temperatures. Fit trickle vents, upgrade extract fans, and maintain consistent background heating. This resolves a large proportion of condensation problems in walls without any structural intervention.
- Targeted internal insulation at reveals: Cold window and door reveals are a common site for surface condensation. Adding a thin layer of insulated plasterboard to reveals raises the surface temperature above the dew point. Improving window thermal performance can also raise reveal temperatures meaningfully.
- Repair external defects: Repoint failed mortar joints, replace cracked render, clear blocked weep holes and cavity trays, repair gutters and downpipes. Where rain penetration is the root cause, fixing the envelope is the only durable solution.
- Cavity clearance and extraction followed by re-insulation: Justified where the insulation is confirmed saturated, bridging, or otherwise failed, and where the building envelope has been repaired first. Extraction must be carried out by an accredited contractor and followed by independent Technical Monitoring and Clearance Certification.
- External wall insulation (EWI): An option for properties where the cavity cannot be re-insulated or where the exposure rating makes cavity fill unsuitable.
- Foam fills: Polyurethane foam cannot be vacuum-extracted. Remedial options are severely limited and typically involve significant disruption. Any contractor proposing foam extraction should outline the full scope of demolition required before you agree to anything.
Any installation or retrofit work should comply with PAS 2030, the standard governing energy efficiency retrofit. Expect your contractor to hold TrustMark registration and to provide a clearance certificate on completion. OSCAR Onsite’s Cavity Clearance Certification is the independent verification step that confirms the cavity is clean and dry before re-insulation proceeds.
Decision rule: If your diagnosis confirms surface condensation from poor ventilation, start with ventilation and heating changes before spending anything on the cavity. If the diagnosis confirms penetrating damp with saturated insulation and a repaired envelope, extraction and re-insulation may be justified — but only after the envelope is sound.
How long does drying out take after remedial works?
Realistic timescales vary considerably depending on the severity of saturation, the wall construction, and the season. Salford University’s experimental work found that drying of inner masonry leaves can take months — not days — even in controlled conditions.
- Ventilation and heating fixes (days to weeks): Surface condensation caused by inadequate ventilation typically responds within days of improved air exchange. Mould staining may persist and require treatment, but the moisture source is removed quickly.
- External repairs (weeks): Repointing, gutter repairs, and weep hole clearance stop new water entry almost immediately, but the masonry needs time to dry before moisture readings stabilise.
- Masonry drying after saturation (weeks to months): A saturated cavity wall can take several months to reach acceptable moisture levels, particularly in autumn and winter when ambient humidity is high and temperatures are low.
- Extraction and re-insulation project (days of active work, months of monitoring): The extraction itself typically takes one to three days depending on property size. The cavity must then be monitored until moisture readings confirm it is dry — a process that can take three to six months in wetter conditions.
- Clearance certification: A clearance certificate should only be issued once calibrated moisture readings confirm the wall has reached an acceptable level. Do not accept a certificate issued immediately after extraction.
Wetter months slow drying significantly and can delay re-insulation by a full season. Plan remedial works to begin in spring where possible, giving the maximum drying window before the following winter.
When should you get professional help, and what should you ask?
The moment you are unsure whether you are dealing with condensation or penetrating damp, get an independent inspection. Do not rely on a contractor who is also selling you extraction — that is a structural conflict of interest.
Questions to ask any inspector or contractor:
- Do you provide thermal images, borescope stills or video, and calibrated moisture logs as part of your report?
- Will you issue a formal CWI Condition Inspection Survey report with written recommendations?
- Are you accredited by OSCAR Onsite or another recognised body for CWI surveying?
- If extraction is recommended, will independent Technical Monitoring and a Clearance Certificate be provided?
- Do you have TrustMark registration and PAS 2030 compliance for any installation work?
Red flags to walk away from:
- An extraction quote offered at the first visit, before any diagnostic evidence has been gathered.
- A contractor who cannot provide borescope stills or a written condition report.
- Claims that an insulation guarantee covers the damage — many guarantees exclude damage caused by secondary building decay such as failed pointing, so an independent inspection is still necessary before pursuing any warranty claim.
- Foam extraction proposed without a full scope of works and cost for the associated demolition.
- No mention of a clearance certificate or post-extraction monitoring.
OSCAR Onsite’s CWI Condition Inspection Survey uses thermal imaging, borescope inspection, and calibrated moisture metering to produce a formal written report with clear recommendations. OSCAR Onsite authored the UK’s first NVQ Level 2 qualifications in CWI Surveying & Inspection and CWI Extraction & Clearance — the national benchmark qualifications for the sector. Where extraction is confirmed as necessary, an OSCAR Onsite Accredited Member Firm carries out the works, followed by independent Technical Monitoring and Clearance Certification. That sequence protects you, your property, and your ability to re-insure or sell.

How can you reduce the risk of condensation recurring?
Prevention is mostly maintenance. The properties that develop the worst cavity wall moisture issues are usually those where small external defects have been ignored for years.
Practical maintenance checklist:
- Clear gutters and downpipes at least twice a year — blocked gutters are one of the most common causes of water entering cavity walls.
- Inspect external pointing and render annually; repoint any failed joints before winter.
- Check that weep holes at the base of the cavity are clear and unobstructed. Learn more about cavity wall vents and why they matter.
- Fit trickle vents to windows in rooms prone to condensation, and ensure extract fans in kitchens and bathrooms are working and vented to outside.
- Avoid drying clothes indoors without ventilation — a single load of laundry releases a significant amount of moisture vapour into the air.
- Maintain consistent background heating through winter rather than allowing rooms to cool completely overnight.
- After heavy storms, check exposed elevations for new damp patches and log any changes.
Suggested maintenance schedule:
- Annually (spring): Full external inspection of pointing, render, gutters, downpipes, and weep holes.
- Seasonally (autumn): Clear gutters before winter; check trickle vents and extract fans are functioning.
- After heavy rain: Check exposed walls internally for new damp patches; photograph and log.
Before adding any further insulation to a cavity wall, assess the wall’s exposure rating and existing condition. Consult BS 5250 and PAS 2030 before specifying any new insulation product — the wrong choice in an exposed location can create exactly the moisture problems you are trying to prevent.
Why independent, evidence-led inspection is the only sensible starting point
The industry has a well-documented problem with sales-led extraction: a contractor visits, identifies damp, and recommends immediate extraction — often without a borescope, without moisture logs, and without a written condition report. The homeowner pays for extraction that may not have been necessary, and the root cause (failed pointing, a blocked gutter, inadequate ventilation) remains unaddressed. The damp returns.
What I see repeatedly is that the properties with the worst outcomes are not those with the most severe insulation failures — they are the ones where someone acted fast without evidence. An independent condition inspection costs a fraction of an extraction job. It either confirms extraction is needed and gives you the evidence to hold the contractor to account, or it identifies a simpler cause that costs far less to fix.
OSCAR Onsite exists precisely to break that cycle. We authored the UK’s first NVQ qualifications in this sector because the industry needed a defined technical standard — not just for contractors, but for the surveyors, housing providers, mortgage lenders, and conveyancing solicitors who need to understand what a proper CWI inspection actually looks like. Independent inspection protects your property value and your household’s health.
An independent inspection from OSCAR Onsite: what to expect

If you are seeing damp, mould, or cold spots on an external wall, the right first step is an independent CWI Condition Inspection Survey — not an extraction quote. An OSCAR Onsite inspection includes thermal imaging, borescope inspection, calibrated moisture metering, and a formal written condition report with clear recommendations. You receive evidence, not a sales pitch.
Where extraction is confirmed as the appropriate remedy, OSCAR Onsite connects you with an Accredited Member Firm that meets defined technical and ethical standards. Every extraction is followed by independent Technical Monitoring and a Clearance Certificate — the independent verification that the cavity is clean, dry, and ready for re-insulation. If you need cavity wall insulation extraction, insist on that certificate before any new insulation goes in.
Book your OSCAR CWI Condition Inspection Survey at Oscaronsite and get the evidence you need before making any decision.
Sources
The sources below underpin the guidance in this article. Each is worth consulting directly if you are dealing with a complex case or preparing for a professional inspection.
- Code of Practice_Control of Dampness in Buildings_Jan 2023
- Internal wall insulation guidance (IWI guidance)
- Using numerical simulation to assess moisture risk in new and retrofit constructions (R8/R11 simplified rules)
- Experimental study of heat and moisture transfer in insulated cavity walls (AIVC/Salford)